
Your ignition coil may be attached to the fender or engine (externally mounted), or mounted inside the distributor cap (internally mounted). They can be tested either on or off the vehicle. Before replacing the ignition coil, we suggest you inspect and test the distributor cap and rotor and the primary voltage circuit.
Testing Externally Mounted Ignition Coils
1. Disconnect the distributor cap end of the coil wire and attach to the ignition tester. Attach the ignition tester to a good ground, away from any fuel lines. A good spark tester can be made from an old spark plug gapped to 0.200. Crank the engine and observe the tester for spark. If a crisp blue spark is noticed, the ignition coil is working properly. If a pale yellow spark is noticed, continue on to step two.
2. Disconnect the negative battery cable.
3. Note the position of each wire on the ignition coil and remove them.
4. Inspect the coil for leaks around the top and for external damage. If any are found, replace the coil.
5. In the proper service manual, locate the test specifications for your vehicle's coil.
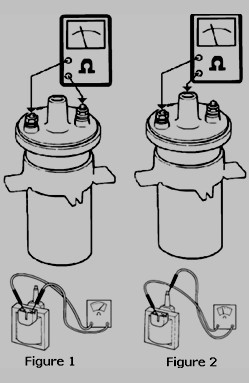
6. Connect the ohmmeter to the primary studs of the coil. Turn the meter to the 0-2M ohm scale. Compare your reading to the primary winding specification for the coil. (Figure 1)
7. Remove either one of the meter leads from the primary stud and connect it to the coil wire lead. Reset your ohmmeter to the 2M-20M ohm scale and compare the reading to the secondary winding specification for the coil. (Figure 2)
8. If the primary or secondary winding readings do not fall within the range indicated in the service manual, replace the coil.
9. If the coil tests within specifications, refer to the proper service manual for further diagnosis.
Testing Internally Mounted Ignition Coils
1. Disconnect the negative battery cable.
2. Disconnect the tach, ignition coil and battery primary wire connectors from the distribution cap.
3. Remove the ignition wire set retainer ring from the distributor cap.
4. Turn the hold-down fasteners counterclockwise one quarter of a turn and lift the distributor cap off the distributor.
5. Remove the coil cover from the distributor cap. This will allow you to inspect the coil and wires for damage. Replace the coil if any damage is found.
6. In the proper service manual, locate the test specifications for your vehicle's coil.
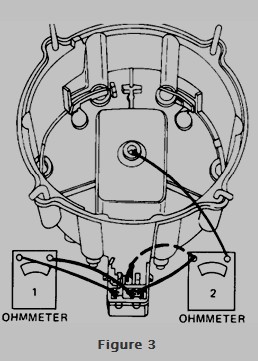
7. Turn the distributor cap over so the leads are visible. Connect the ohmmeter to the primary leads (Figure 3). The primary lead wires will be red and yellow or red and white.
8. Turn the meter to the 0-20M ohm scale. Compare your reading to the primary winding specification for your coil.
9. Remove the meter leads from the primary wires. Connect the meter from the black ground connection to the center carbon button found inside the cap. The black ground connection will be the center lead on the distributor cap.
10. Record and compare the reading to the secondary winding specification for the coil.
11. If the primary and secondary winding readings do not fall with in range indicated in the service manual, replace the coil.
12. If the coil tests within specifications, refer to the proper service manual for further diagnosis.
» More Information 

 Ignition Coils


